
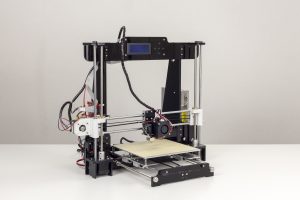
The Anet A8 was the first 3D printer I got. I did a lot of research and this seemed like the best deal at the time (June 2018ish). It is basically a Prusa I3 clone although nobody would mistake it for a Prusa. I got mine from eBay for about $150US. Not a terrible price and I must say it actually printed really well right out of the box. Now right out of the box meant that I had to take several days putting it together. It went together fairly easily. The worst part of the whole thing was pealing that damed paper off of the acrylic. What a pain in the ass that was. You will definitely need to watch some youtube videos on how to put it together as the printed instructions are a bit lacking in detail. All in all, the build probably took me about 8 hours and went fairly well. I didn’t have too much trouble and in the end, everything worked first go.
Fire it up

I went through the bed leveling process. Thought I had it all good to go and thought I was ready to print. I decided to print something on the microSD card that came with the printer. I chose the pyramid. Little did I know it would take about 8 hours to print. Heated up the hot end and the bed and told it to print. First thing it did was gouge the tape on the build plate. I guess my bed leveling wasn’t good to go after all. It took me a few iterations and some more masking tape to get it right. Once I got it set, The first print started. It actually went perfectly. It took awhile. A Loooong while. Since this was the first time I had ever even seen a 3D printer work, I didn’t realize how slow they are. Once you see what it takes to lay out plastic at 0.4mm wide and 0.1mm for each layer you start to get the idea of why Fusion Deposition Modeling (FDM) printing is so slow. It was fun to watch it go. I would check in on it every few minutes or so. The first few layers seemed to take forever.

But once it was all said and done and almost 8 hours had past, I was rewarded with a very nice print that I am still amazed at today. The detail of this Mayan pyramid with all the stairs is really cool.
Upgrades
So there are some vital upgrades you need to do to this machine to make it safe and useful. This first is to flash the bootloader and load Marlin firmware which will allow you to have thermal runaway protection. There are tons of people who have almost burned their houses down without this. Don’t be one of them. Next I added a MOSFET for the heatbed. Before I installed this, every time the bed would start heating, the fans would slow down. This was a clear indication that the board really cannot properly handle the current that the bed heat requires. Once more, this is a safety upgrade. Many people will tell you to put one on the hotend as well but it isn’t really necessary. The hotend doesn’t draw nearly the current the bed does. I printed a bunch of upgrade parts such as a removable hotend fan that is held in place by magnets. I cannot tell you how many times I had to unscrew the fan from the extruder to remove stuck filament. What a pain that was. This was all made unnecessary when I changed over to a Bowden style extruder as part of the AM8 upgrade I discuss below.
Final Thoughts
So what do I think of the Anet A8? Overall it is a capable printer and for those who are not afraid to really dig into building a kit, it isn’t a bad place to start. You will really understand how the thing goes together and what makes it tick. The acrylic frame is not really rigid enough so you can either print some mods to stiffen it up or you can do what I did and change the frame over to aluminum 2040 extrusions and make it an AM8. There is a great project on Thingiverse by Pheneeny which is what I used to make mine. Here is my article on my conversion to make it the printer it is today.